Random Selection Software: Generate a Random Selection

DrugTestNetwork’s Random Drug and Alcohol Selection Software will generate random selections from a single account (an individual pool) or multiple accounts combined as a consortium; each account represents a list or participants.

This tutorial will guide you through the details to generate a random selection to pick a number of participants for drug and alcohol testing.

The random selection control provides details about the random selection in multiple sections.  In the final section, the user will review the number of participants to select: by percentage and count.

  • DOT Category control for DOT randoms when participant categories are missing.
  • Annual Selection/Testing Targets.
  • Number of random selections required and conducted to date.
  • No. of currently eligible participants and the average number over the year..
  • Random Selection Method.
  • Year to Date collection statistics that contribute to the percentages.
  • Random test results that are not referenced to a random selection event.
  • Percentages & Counts automatically set for current random.
  • Picking Alternates.
  • Random Selection Notes.

Random Control Page:

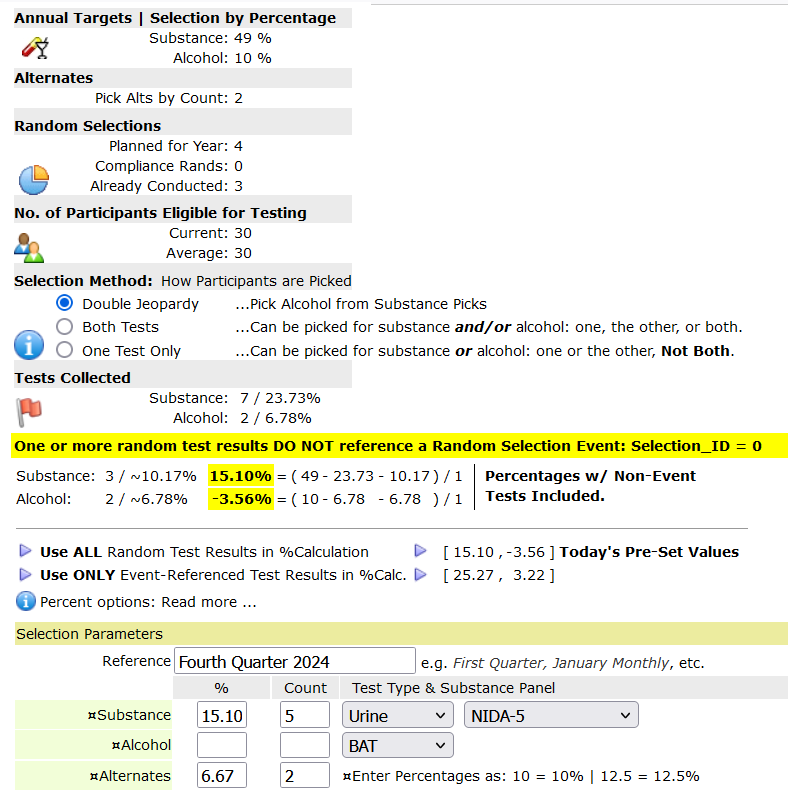
Below is a screen shot of the random selection module.

The design is Top/Down: the parameters used to generate the random are outlined at the top so the user can easily review the details sequentially, from the top of the page, to the bottom, where the button is located to generate the random. Take a moment to familiarize yourself with the layout.

The random selection parameters that are account specific for individual pools or consortia, are managed in their respective profiles and include:

  • Annual targets and no. of alternates to pick.
  • No. of random selections planned for the year
  • Selection Method
  • Date to schedule the random and the roll over for the next random.
The random selection control will use the annual target information to calculate the percentage/count to pick with each random selection based on the number of randoms scheduled for the year, the average size of the participant list, and the number of drug and alcohol tests already collected.  It’s important that results are entered for previous random tests so the percentage calculations are accurate to date.

Random Selection Participant DOT Category:

A DOT Category must be specified for each participant for the DOT Mode specified in the account profile. Modes: FMCSA, FAA, PHMSA, FRA, USCG, FTA.

The Category is essential for the preparation of the Quarterly and Annual MIS Report.  You will see a warning if the category is missing for a single participant. You can select a default category to use for participants missing their category before you generate the random.  If you don’t select a default category to apply, you can resolve the issue later when you prepare the DOT MIS Report.  Resolving missing categories after the fact is routine and straightforward.

You will see the message below when categories are missing:

WARNING: A DOT category is MISSING for one or more employees. You can pick a default category here.  The category you pick will be applied to EACH PERSONNEL RECORD MISSING A CATEGORY. The DOT MIS Report requires a Mode & Category specification for everyone in a random selection pool.

Annual Targets:

This section shows the annual targets specified for the consortium or the individual pool.  For example, in 2024, according to the DOT Mode FMCSA, you are required to test 50% for substance and 10% for alcohol.  The percentages vary by Mode.  For a consortium, the percentages are specified in the consortium profile.  For individual accounts, the percentages are specified in the Account Profile under the section: Random Selection Parameters.  The Random Selection Control Module shows the percentages.  You can edit the random selection parameters for the consortium or the individual pool (account) directly.  At the top of the page, on the left, you will see the edit icon – click the icon to open the profile editor where you can manage the parameters.  When the consortium or account profile is saved, there will be a link to come back to the random selection control.

This example specifies 52% 11%. If you’re generating randoms quarterly, for the first quarter randoms you’ll select 13% for substance (52/4=13), 2.75% for alcohol (11/4=2.75).  If everyone picked is tested, the percentages for each subsequent quarter would be the same.  If some are not tested, the percentages will be automatically adjusted to so you will achieve your target percentage with the fourth quarter random.  The percentages for each random are calculated based on the number of drug and alcohol tests collected and the average size of the pool across all the randoms generated for the year.

Random Selections Conducted:

This section displays the number of random selections scheduled for the year and the number that have already been conducted.  This example shows that randoms are generated quarterly (4) and one random selection has been completed.  If the percentage yet to complete, for example, is 33%, the percentage for the next random would be calculated as 33/3=11%.

No. of Participants:

The current and average no. of participants is displayed.  The average is used to calculate the percentages of collected test results for the year.  If the random is for a consortium, it also reports the number of accounts that are members of the consortium.


Random Selection Method:

There are three ways to pick people from a list for both a drug and an alcohol test.  Using Double Jeopardy (DJ), the random selection control first picks participants for the substance test, and then random selections for the alcohol tests are picked from the participants who were already selected for the substance test.  DJ minimizes the number of participants selected and no one is picked for just an alcohol test.

Click the information symbol to read how the other two methods select participants for substance and alcohol tests.

Tests Collected:

This section shows the number and percentage of substance and alcohol tests collected.  The percentages are based on the average size of the list of participants across all random conducted for the year.  In the example below, 42 and 11 substance and alcohol tests were collected which represents 35.59% and 9.32% for substance and alcohol, respectively.

Random Test Result Records NOT Referenced to an Event:

For each participant selected, an empty drug/alcohol record is created.  When you get test results from the Lab, MRO, or Clinic, for a random, you will want to find the existing record and enter the results.  If you create a new test result record, as you do with a Pre-Employment or other test results, the originally created test result record, with no test results entered, will appear as a  random test that was not conducted. The originally created record references the random selection event that created it.  If you create a new record for a random selection test, it will not reference the selection event.

In this example, 3 substance test results and 2 alcohol test results do not reference a random selection event.  The 3 substance and 2 alcohol tests represents approx. 10.23% and 6.82%, respectively.  The percentage of substance and alcohol tests that reference selection events have been calculated as 23.86% and 6.82%, respectively.

If the percentage calculations take the non-event records into account, the percent calculation for the substance test is:  (50 – 23.86 – 10.23)/2, i.e., the annual target (50) minus the percent calculated for event related records, minus 10.23% for the non-event related tests counted, divided by 2, the number of random selections left to conduct the year – it’s spreads out the annual target over the number of randoms scheduled.

Click the about icon to read more about the numbers reported.  If you want to include these test results in the percentages for the random selection you’re about to generate, click the option:
Use ALL Random Test Results in % Calculation.

Percentages and Counts for the Random Selection:

The counts shown here are the number of participants that will be selected for a Urine Substance Test and a Breath Alcohol Test.  The panel represents the list of substances that will be tested.  NIDA-5 is generally the 5-Panel Federal Drug Test that includes the 5 substances required by the DOT.

In this example, 50 participants will be selected for the substance test and 10 participants will be selected for a breath alcohol.  16.67% of the no. of participants in the current list who are eligible for testing calculates as 50.  If the percentage is a fractional number, it is rounded up to the next whole number.  The no. of alcohol tests is calculated identically.  You can change the numbers as needed. Enter a new percentage and the count will change.  Enter a new count and the percentage will be recalculated.  Enter zero (“0″) if you want no one selected.

The Reference is automatic when the number of randoms scheduled for the year is 4 (quarterly) or 12 (monthly), otherwise, enter a Reference that is appropriate for the occasion. The Reference appears on the printed lists of participants selected.

Alternates:

When you generate a random for a consortium, you can specify a number of alternates to pick from each company, if a primary selection was picked from the company (member account).  The value entered can be a count or a percentage and is indicated by choosing Count or Percent option. It is recommended that you specify the value as a count.  If you enter 2, for example, then every consortium member who has a participant picked, will have 2 alternates picked from their list.  Alternates are not picked from member accounts that had no primary selections picked.

If the random selection is for an individual pool (a single account) you will specify a percentage or count for the number of alternates to pick in the same way you enter the selection values for the substance and alcohol test.

Notes:

In the account profile (individual pool) or the consortium profile, a note can be entered that appears in the random selection control to help the user remember details that may need consideration.

Click the button to generate the random:

When the random selection is complete, you’ll be presented with the list of participants selected and options to print the list(s).  The initial page provides a number of options to print the random selection for the administrative user.  You will also find an option on that page to open the email/print module so the random selection for each account in the random selection (an individual account or each account in the consortium) can be emailed the account contact or printed including with the company address if you need to mail the selection to the account contact.

Random Selection Results Summary Pages

Follow-Up / SAP / EAP / Periodic Random Testing

Setting Up an Employee for Random Periodic Drug and Alcohol Testing After a Positive Test and Issue a document with the dates to the Employer:

When an employee tests positive for drugs and/or alcohol in a random drug test, the employee may be required to participate in random periodic testing to protect their employment, ensure compliance, safety, and rehabilitation. This process involves setting up a testing schedule that covers weekly, or monthly testing over a specified period; for example, a year.  Scheduled dates are randomly generated based on the Periodic Testing Profile established for the employee as outlined below.

Developing a Testing Schedule: Frequency & TimeFrame:

  • Frequency: The number of tests required within a TimeFrame.
  • TimeFrame: For example:
      • 7 = Weekly
      •  30 = Monthly
Frequency/TimeFrame determines how often the employee requires testing:
    • 1/7 = once a week
    • 2/14= twice every 14 days.
    • 1/30= once a month

Setting up the Periodic Profile for an employee:

Open the personnel profile editor for the employee.

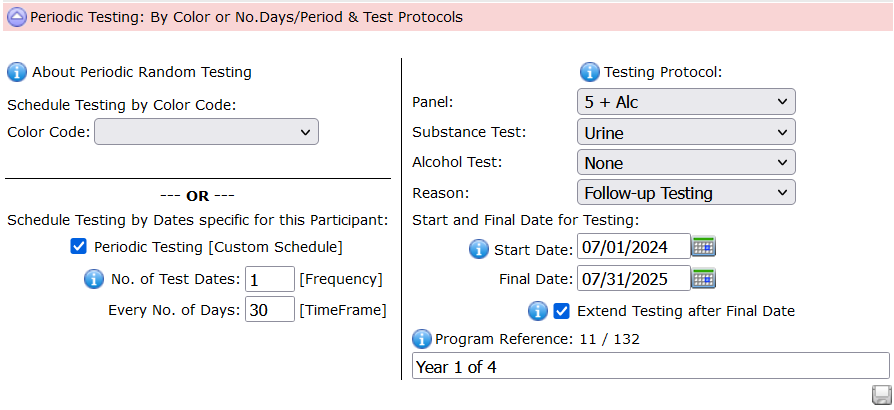
Open the section: Periodic Testing: By Color or No. Days/Period & Test Protocols

To establish a tailored set of dates for the employee, check the box:
Periodic Testing [Custom Schedule].  Color Testing is outlined in another article.

The example above establishes testing once a month between July 1, 2024 through July 31, 2025.

The Testing Protocol outlines the testing required.

Click the info icons to learn more about each component.  Be sure to save the record when you’re done.

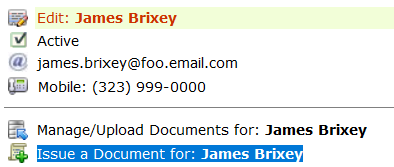
When the record is saved, click the tools symbol to open data management options for the employee.

From the options choose:

When the page opens, follow the instructions to create random dates.

Issue a document (PDF) with the dates and testing requirements to the company supervisor:

Once you’ve created the random dates for testing, you can issue a document to the employee’s supervisor with an outline of their requirements for testing and the dates for the tests.  To issue the document, first locate the data resource options for the employee from the main menu: Personnel.

From the Personnel page, search for the employee, and from the search you’ll see the click the tool symbol that appears on the line for each person returned by the search query.

As shown below, from the Tools/Resource page click the option:
Issue a Document for …

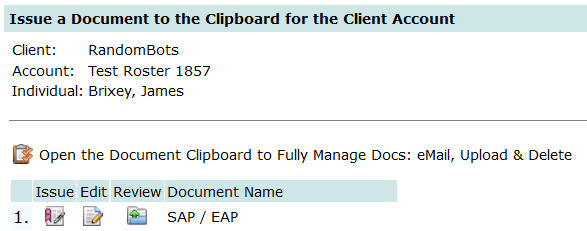
Choose the Document Template SAP / EAP (this is a sample document template that was provided with your subscription to DTN and can be found under Other_Data > Section 6.b General Documents.  Using these templates you can create documents that automatically fill-in the company name for the account, contacts, employee name & ID, etc.  for any content you might need.  The SAP/EAP template is specific to this example.  The issue document module recognizes keywords {{keyword}} and replaces the occurrence of {{keyword}} with its respective data element.  For example, where {{employee}} appears in template, the module replaces it with the first and last name of the employee from their data record.  If you review the SAP/EAP template, you will see the {{keywords}} used for periodic testing and the dates generated.

Click the issue symbol to issue the document.

When you issue the document, it will get posted to the clients Document Clipboard and emailed to the company contact.


DOT MIS Report: Consortium & Members

For drug and alcohol testing, a company can join a consortium so their employee pool is combined with the other consortium members for random selection.  The random selection picks names from a list comprised of all active employees across all the members’ rosters.  Every member company is in DOT compliance simply by participating in the random selections, regardless if anyone from their company is picked.

The DOT specifies annual targets for the number of random drug and alcohol tests that must be conducted.  For example, FMCSA requires 50% of the pool submits a urine sample for substance testing, and 10% of the pool submits to a breath alcohol test.  If these targets are met, the consortium is considered in compliance for random testing, which means every member company is in compliance regardless the number of random tests their company contributes to the overall numbers.  The annual percentages are based on the average number of participants across all randoms conducted for the year.  DrugTestNetwork’s data management application for drug and alcohol testing keeps a complete audit trail of the participant list for every random selection conducted.  When an audit is conducted, you will often be asked to produce a list of participants for each random.

You can generate the DOT MIS Report for the entire consortium and for each individual member accounts.  Typically, the TPA provides the MIS Report for each member’s testing and not for the entire consortium.  If audited, the DOT Auditor may ask the TPA for the MIS Report for the entire consortium. Companies with 50 or more drivers are required to submit the report to the DOT.  Companies with fewer are not required unless requested.  Check the DOT for these requirements as the details may change.

Consortium DOT MIS Report: To generate the MIS for the consortium, from any the main application pages, click the Consortia menu and then click the report icon  on the line that represents the consortium.

Individual Member DOT MIS Report: To generate the MIS for an individual company that is a member of the consortium, search for the company and click its report icon .

From the report module, choose the months to be covered in the report. For example, if you want just the first quarter, pick January and March, or for a full year report, pick January and December.  Below months,  indicate the year the report covers, and scroll down the page and click the option: DOT MIS Report.

Contact / Client Representative Profile

A Contact is a customer representative with whom you communicate regarding employee drug & alcohol test results, random selections, personnel / roster management, and more.  You can give contacts login access to view reports and manage their accounts.

Each company/client can have multiple contacts and each contact can be assigned to one or more accounts under the company.

The contact profile editor lets you control login access, what they can see and do when they log-in and what reports they receive through the application.

To add or edit a contact: from the Clients page, search for the account to which the contact belongs.  For the accounts returned by your search, near the left side of the listing, on the line that represents the company/account, click the Client-Mgt icon to open the management module.  When the module window opens, click the button, on the left, titled: Contacts.

Click the icon   to add a new contact or click the edit icon to edit the profile for an existing contact.

The contact profile editor has multiple sections. Continue reading

Clinic Services: Create an Invoice

If you provide clinic services, you can create an invoice for any service the clinic offers.  If a customer arrives for drug testing, you can record the collection and the results, if it’s an instant test, and create an invoice, if the service is a self-pay, i.e., the individual is paying for their own test.  If other services are provided in the same visit, you can add additional services to the invoice once the collection is recorded.

If the fee for services is paid by the employer, an invoice doesn’t need to be created at the time of the collection.  The fee for the drug/alcohol test will be added automatically to the employer’s invoice the next time an invoice is generated for the account that represents the employer in your database; all test results and collections are automatically invoiced.  If you charge for an observed collection, be to check the box in the collection module to indicate the sample was an observed collection.  For the observation fee to automatically get included in the invoice for the employer, be sure your list of services includes the observation fee, and be sure the clinic is designated as a Service Center. Services and Clinics are managed under Other Data. If you’re providing additional services, you can add the fees for the services as pending line items.  All pending line items are added to the employer’s invoice the next time an invoice is generated for the employer.

To enter a collection into the database, from any of the main application pages, click the beaker icon, seen on the left. This action will open the collection module. You can also click the Home icon to navigate to the Home page and choose the option: Enter a Specimen Collection for Analytics and Reporting

How to Create an Invoice for Services that DO NOT include Drug/Alcohol Testing:

If you need to create an invoice for a specific individual, for services that do not include drug/alcohol related testing, click the Home icon, from any of the main application pages, and choose the feature: Invoice a Service for Self-Pay or Account Invoicing

This option will allow you to create an invoice for a self-pay customer or add line items as pending charges that get added to the employer’s invoice next time invoices are generated.  This module creates invoices or line items specific to the individual and the services provided.  If the services are not specific to an individual, there are other places in the application where you can add line items to get invoiced later. This module is used only if the fees are specific to services provided to an individual: physicals, medical exams, respirator fits, functional testing, etc.

This module requires the user to be associated with one or more clinics in the database.

To assign clinics to the user:
From any of the main application pages, click the Account menu.
On the Account page, click the feature: User Management.
On the User Management page, click the Assign icon , under the column titled Clinics, on the line that identifies the user.
When the Assignment module opens, click the green plus sign icon to search for and associate a clinic with the user.

Manage Invoices for an Employer Account:
To manage invoices, search for the Employer Account and click its Client-Mgt icon from the line that represents the account as shown in the screenshot below:


When the Client-Mgt module opens, click the button Acct.Services and choose one of the Invoice features shown below:


Invoice Options allows the user to set some miscellaneous invoice attributes. For Clients with multiple accounts, you can choose to have a single invoice generated for all the accounts or separate invoices for each account, which is the default.

The other features, Invoice and Invoice Line Items, open the same module, however, each one opens the page with a different section upon initialization, and the user can navigate to the other sections after it’s opened.  The feature allows the user to choose from the list of services and create line items that get added to an invoice when the invoice is generated.  The user can also manually enter a line item if a service doesn’t exist for a specific fee that needs to be invoiced.

Drug Test Reports: Entering Results

A Test Result record reports the results of a drug and an alcohol test.

There are three editors you can use to enter a drug/alcohol test:

  • Quick Results
  • Full Result Editor
  • Collection Module

Each editor allows the user to easily enter the personal demographics for a new subject or find an existing subject who is already in the database. With the Full Result Editor and the Collection Module you can also find existing test results for editing if you need to make modifications or create new test results for reporting.

Quick Result Editor (QRE): To use the Quick Result Editor, search for a customer account into which the result will be saved.  When you find the customer account, click the account’s drug/alcohol icon (shown on the right)  to open the editor.  The QRE has most of the data components to completely specify a test result presented on a page where the user starts at the top and scrolls to the bottom to complete the data required for the report. The page shows how many test subjects (employees, drivers, patients, etc.) are currently in the account.  The user can list all subjects in the account and choose the one needed, or easily search to find the person who is the subject of the test.  It the subject doesn’t yet exist in the account, their personal demographics can be entered along with the testing information.  If the user manually enters a new test subject and the person already exists in the account, then the user alerted and can continue with the person identified. From there, the user can enter the rest of the test result data and save it by clicking the Save button at the bottom of the page.

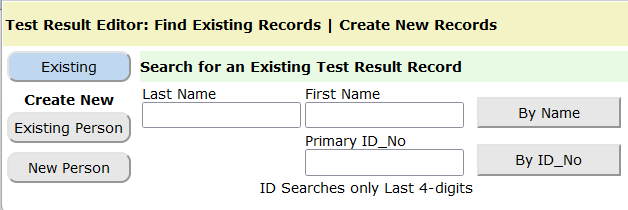
Full Result Editor (FRE): At the top of any of the main application pages, to open the Full Result Editor, click the edit icon (shown on the right ).  Using this editor, the user can search for an existing test result that might need to be modified, or create a new test result for a subject who has submitted a sample for drug/alcohol testing.  The options to find an existing test result or create a new result are accessed using buttons on the left side of the page. The image below is a screenshot of a portion of the result editor when it opens:

By default the editor opens so the user can find existing tests by Name, ID, CCF, Test-ID (database record no.), etc.  Click the button titled Existing Person to find someone to create a new test result record.  Click the button titled New Person and add a new personnel record and create a test result.


Collection Module: To create a test result record for a collection conducted by your clinic, click the Home icon at the top of any of the main application pages.

On the Home page, click the option Enter a Specimen Collection for Analytics and Reporting. Using this module, the user can open an existing record, create a new collection record for an existing subject (a person who is the subject of a test) or enter a new subject for the collection. The user can enter a drug & alcohol record that is a collection only: no results are recorded: the user simply checks a box to indicate the drug/alcohol record is collection only. The user can also select a Panel for an instant test and complete the results for each substance the instant test detects.  When the collection is saved the user can create an invoice if the test is a self-paid test; i.e., the subject is paying for their own test.

The collection has a drop-down list of clinics so the user can specify the clinic where the collection is performed.  The subscriber’s database may have hundreds of clinics listed, however, the only clinics that appear in the drop-down are the clinics assigned to the user performing the data-entry.

To assign clinics to the user:
From any of the main application pages, click the Account menu.
On the Account page, click the feature: User Management.
On the User Management page, under the column titled Clinics, click the Assign icon on the line that identifies the user.
When the Assignment module opens, click the green plus sign icon to search for and associate a clinic with the user.