A Contact is a customer representative with whom you communicate regarding employee drug & alcohol test results, random selections, personnel / roster management, and more. You can give contacts login access to view reports and manage their accounts.
Each company/client can have multiple contacts and each contact can be assigned to one or more accounts under the company.
The contact profile editor lets you control login access, what they can see and do when they log-in and what reports they receive through the application.
To add or edit a contact: from the Clients page, search for the account to which the contact belongs. For the accounts returned by your search, near the left side of the listing, on the line that represents the company/account, click the Client-Mgt icon ![]() to open the management module. When the module window opens, click the button, on the left, titled: Contacts.
to open the management module. When the module window opens, click the button, on the left, titled: Contacts.
Click the icon ![]() to add a new contact or click the edit icon
to add a new contact or click the edit icon ![]() to edit the profile for an existing contact.
to edit the profile for an existing contact.
The contact profile editor has multiple sections.
The first section determines the features, the data, reports, the contact has access to when they login. For example, if you want the contact to be able to see test result reports from the accounts they’re assigned to, click Yes for Review Test Results.
Reasons for Testing (RFT) & Qualitative Results (OQR) to Report to the Contact:

This section determines what test result reports are emailed to the contact. You can send individual reports to the contact or you can send reports in batch for all accounts for all reports not yet emailed to the client.
When you send a single, individual report, all the contacts for the account are presented so you can select one or multiple contacts to whom you want to send the report. Each contact is selected with a check-box. Each contact whose RFT and OQR attributes match the report are automatically selected. If you want to send the report to a contact whose box is not checked, simply check the box and click to send the report.
From the module that sends reports in batch, to all accounts, for all reports not yet emailed to the client, there are options to choose what OQR reports to send and the contacts to whom the reports are sent. Regardless the OQR options the user chooses in the batch module, the reports sent to the contact will be consistent with their RFT and OQR attributes.
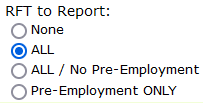
Reasons for Testing (RFT) to Report: This attribute specifies the reasons for testing the contact wants to receive.
- None: no reports are sent to the contact.
- ALL: reports for all RTFs are sent to the contact.
- ALL / No Pre-Employment: all RTFs, except pre-employment are sent to the contact.
- Pre-Employment ONLY: only pre-employment reports are sent to the contact.
 Overall Qualitative Results (OQR) to Report: This attribute specifies the OQR reports the contact wants to receive.
- ALL: all reports are sent to the contact.
- Negatives ONLY: only negative reports are sent to the contact.
- Non-Negatives ONLY: only non-negative reports are sent to the contact.
Also, from the module that sends reports in batch, the user can choose options that determine the extent of the what information is included in the email:
- Detail [Full Report] and Summary
- The full report for each result is attached as a PDF, and the body of the email lists (summarizes) all the reports attached: Donor Name and Overall Qualitative Result
- Detail ONLY
- The body of the email simply states that results are attached.
- Summary ONLY
- The body of the email lists (summarizes) all the reports: Donor Name and Overall Qualitative Result, but does not include attached reports in PDF.
- Announcement ONLY
- The body of the email simply states that results are available; no summary, no attachments. This option assumes the contact will login to see the latest results/reports available.


